
The Amazing World of Microscopes
The Amazing World of Microscopes
At the end of this lesson, you are expected to:
Identify the main parts of a compound microscope.
Describe the specific function of each part of the compound microscope.
Demonstrate proper handling and storing of a compound microscope.
Imagine you have a tiny, invisible world all around you – like the tiny creatures in a drop of water or the intricate patterns on a butterfly's wing. How do you think scientists, like those in the Philippines, get to see these amazing details up close?
Let's play a game! I'll describe a tool that helps us see the unseen.
It has a long tube.
It has different-sized "eyes" you can switch.
It needs light to work.
It helps make very small things look much, much bigger.
What do you think this tool is?
That's right! It's a microscope! Specifically, we'll be learning about the compound microscope, which is like a super-powered magnifying glass.
Welcome, young scientists! Today, we're going to embark on an exciting journey into the world of the very small. Our guide for this adventure will be a powerful tool called the compound microscope. Think of it as your personal portal to a hidden universe teeming with life and intricate structures that are invisible to our naked eyes.
The Department of Education in the Philippines emphasizes the importance of understanding and using this amazing instrument. Why? Because the compound microscope is fundamental to studying Life Science. It allows us to observe cells, the basic building blocks of all living things, and understand how they work. Without it, much of what we know about biology would remain a mystery!
Let's get to know our microscope friend. A compound microscope has many parts, and each one has a special job to do. We can group these parts into a few categories: Ocular, Objective, Focusing, Illuminating, and Support parts.
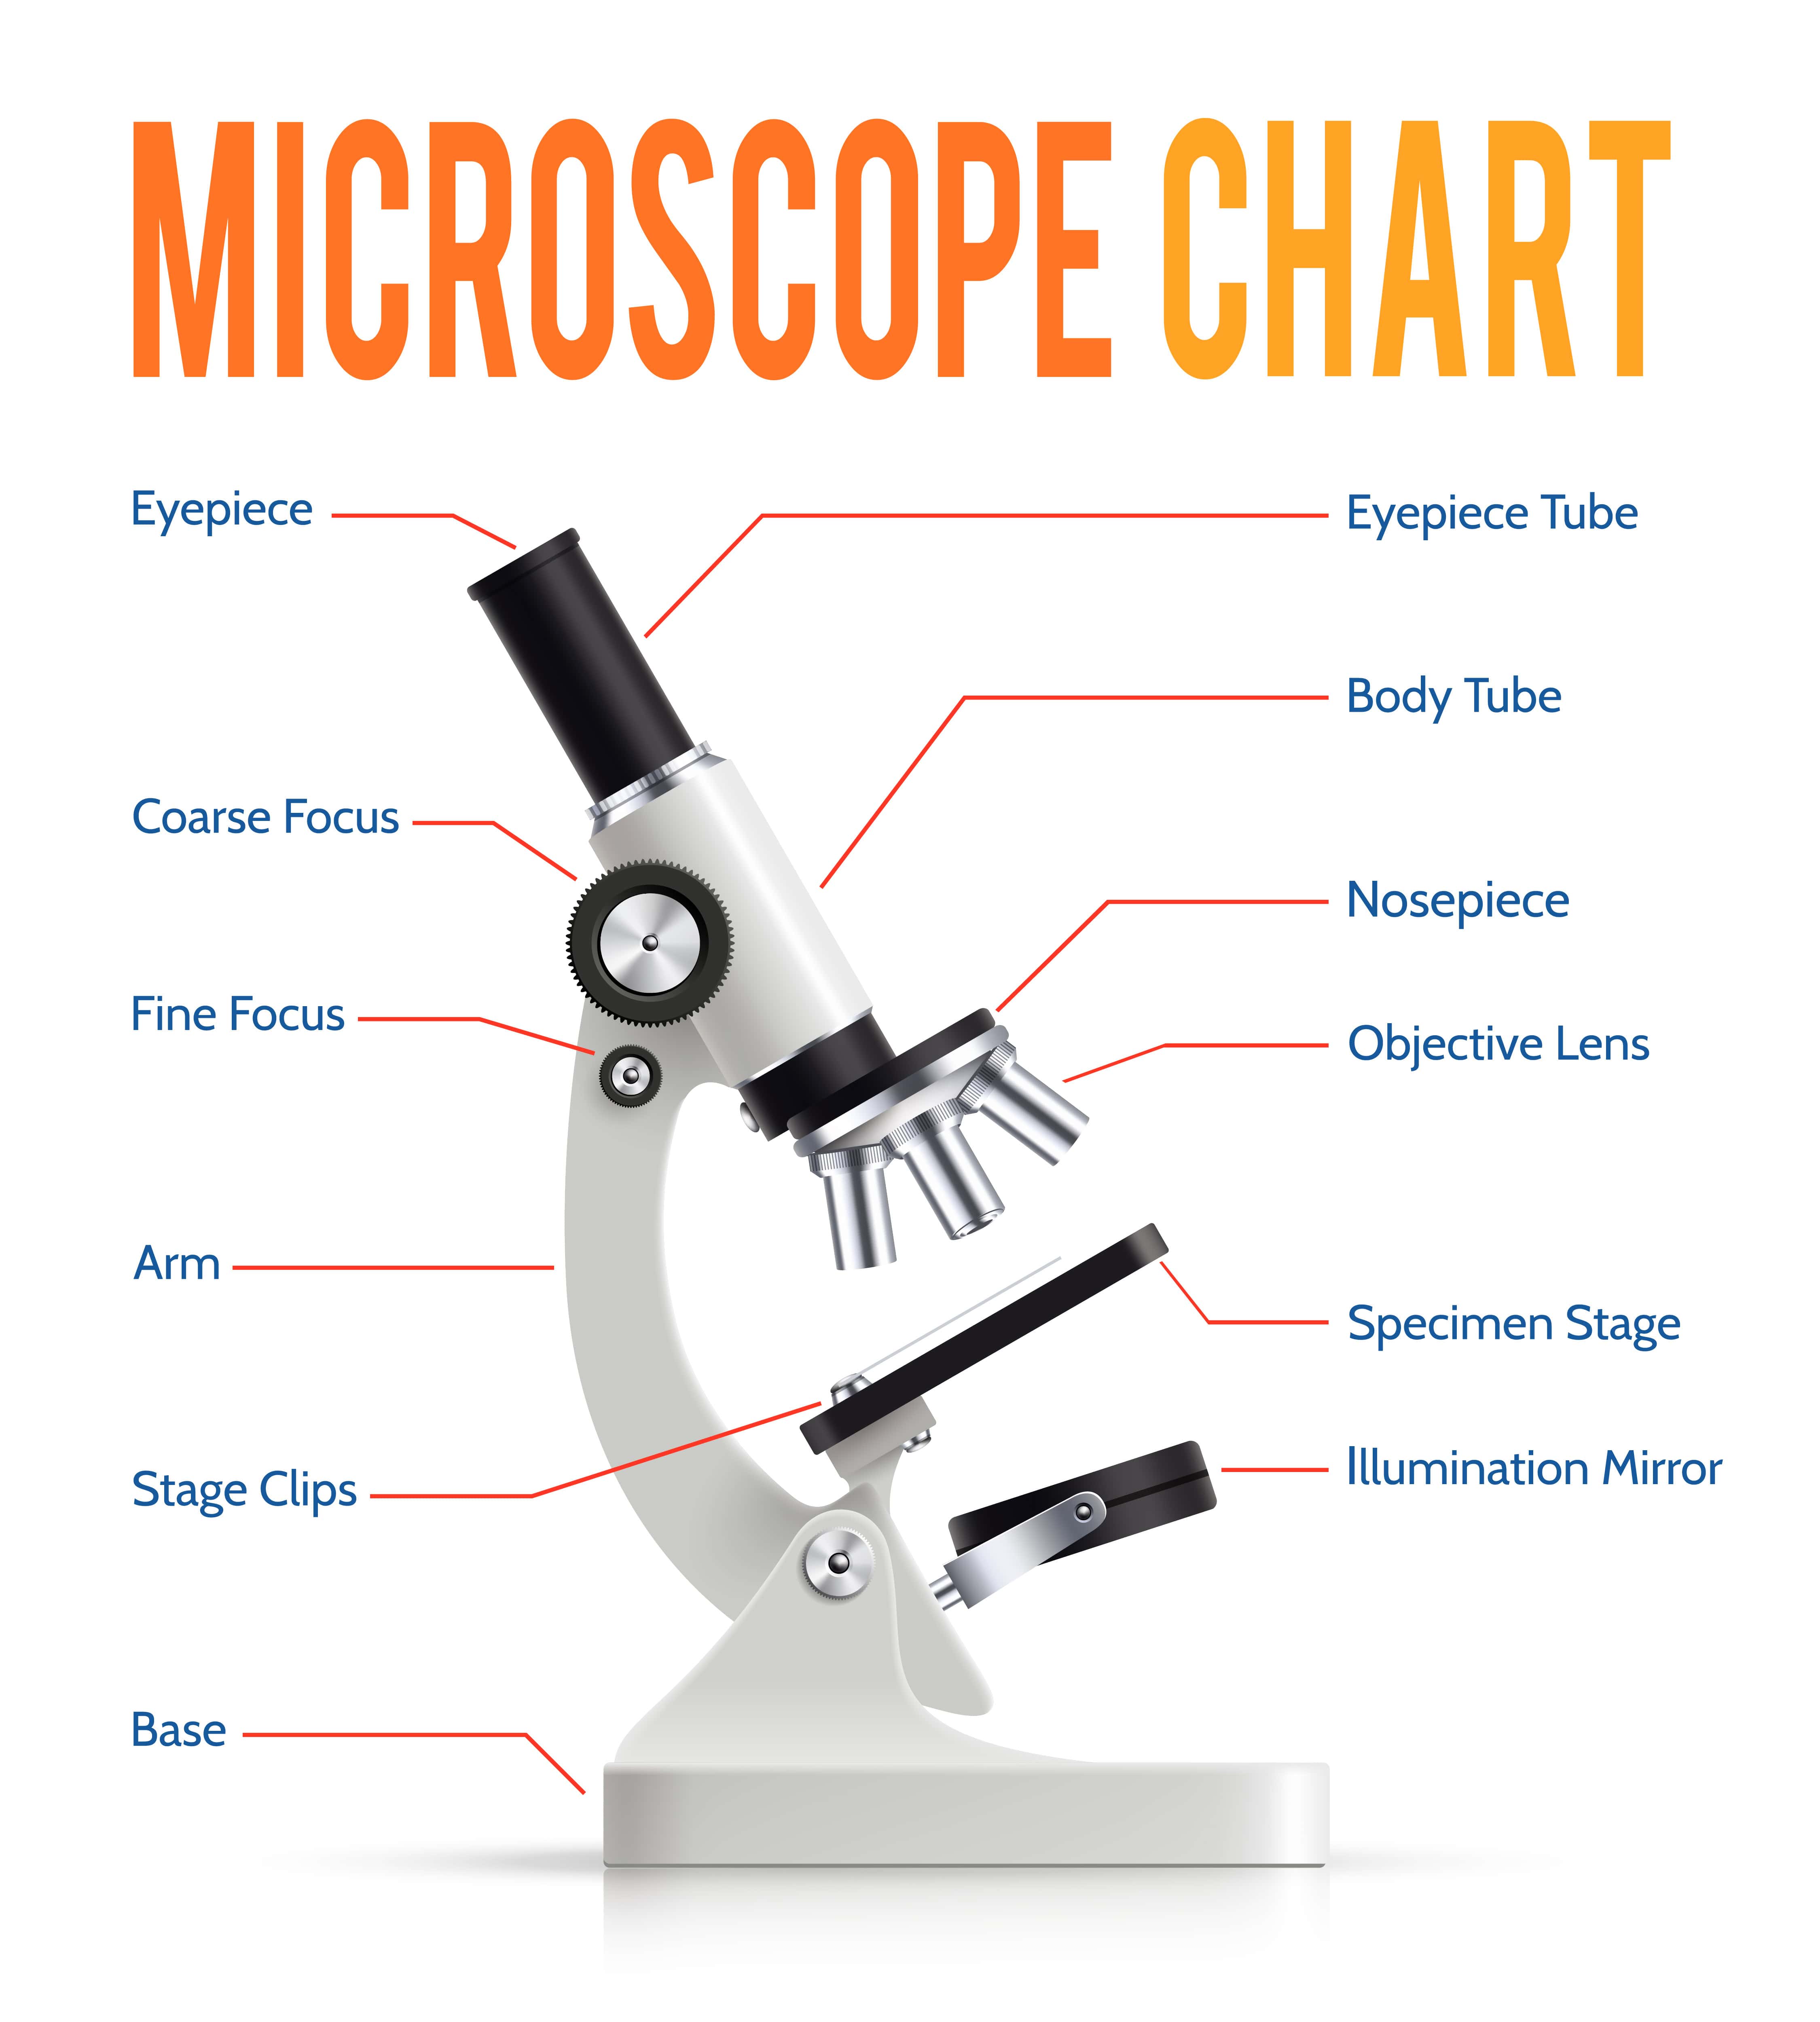
Eyepiece (or Ocular Lens): This is the part you look into. It's like the first magnifying glass in the microscope. Most compound microscopes have an eyepiece that magnifies the image 10 times (written as 10x). Sometimes, you might see microscopes with two eyepieces – these are called binocular microscopes, and they are more comfortable to use for longer periods.
Function: To further magnify the image already enlarged by the objective lens.
Analogy: Think of it as the second pair of glasses that makes the already big image even bigger and clearer for your eyes.
Revolving Nosepiece (or Turret): This is a rotating part located below the eyepiece. It holds the different objective lenses. You can rotate it to switch between different levels of magnification.
Function: To hold and allow easy switching between objective lenses.
Analogy: Imagine a carousel with different magnifying glasses attached. You spin it to pick the magnifying power you need.
Objective Lenses: These are the lenses located on the revolving nosepiece, closest to the specimen you are observing. Microscopes usually have three or four objective lenses with different magnifying powers:
Scanning Lens (Shortest): Usually 4x magnification. This is the first lens you should use to find your specimen. It gives you a wide view.
Low-Power Lens (Medium Length): Usually 10x magnification. Use this after you've found your specimen with the scanning lens. It provides a bit more detail.
High-Power Lens (Longest): Usually 40x magnification. This lens gives you a much closer look at the details of your specimen.
Oil Immersion Lens (Very Long, often with a 'red band'): Usually 100x magnification. This lens is used with a special immersion oil to get the highest magnification. You won't typically use this in Grade 7, but it's good to know it exists!
Function: To magnify the specimen. The total magnification of what you see is the magnification of the eyepiece multiplied by the magnification of the objective lens you are using (e.g., 10x eyepiece * 40x objective lens = 400x total magnification).
Analogy: These are like different zoom levels on a camera. The scanning lens is like a wide-angle shot, while the high-power lens is like a super close-up.
Coarse Adjustment Knob: This is the larger knob, usually found on the side of the microscope. When you turn it, the stage (or the body tube) moves up or down significantly.
Function: Used for initial focusing, especially with the low-power objective lens. It moves the stage or body tube a large distance. IMPORTANT: Never use the coarse adjustment knob with the high-power or oil immersion lenses, as you could easily break the slide or damage the lens!
Analogy: This is like the big, quick adjustment you make when you first try to focus something.
Fine Adjustment Knob: This is the smaller knob, often located within the coarse adjustment knob. When you turn it, the stage (or body tube) moves up or down very slightly.
Function: Used for sharp, precise focusing after using the coarse adjustment knob, especially with the high-power objective lens.
Analogy: This is for the tiny, delicate adjustments needed to make the image perfectly clear and sharp.
Light Source (Illuminator): This is usually a mirror or an electric light bulb located at the base of the microscope.
Function: To provide light that passes through the specimen, allowing you to see it.
Analogy: This is like the flashlight that shines on your object so you can see it better.
Diaphragm (or Iris Diaphragm): Located beneath the stage, this is a rotating disc with different-sized holes or an adjustable opening like the iris of your eye.
Function: To control the amount of light passing through the specimen. Adjusting the diaphragm can improve the contrast and visibility of the specimen. If the image is too bright, you close the diaphragm; if it's too dim, you open it.
Analogy: This is like the dimmer switch for your flashlight. You can make the light brighter or dimmer depending on what works best.
Base: The bottom support of the microscope. It holds the light source and provides stability.
Function: To support the microscope and house the light source.
Analogy: This is the foundation or the feet of the microscope, keeping it steady.
Arm: Connects the body tube to the base. It's also used as a handle when carrying the microscope.
Function: To support the upper parts of the microscope and serves as a handle for carrying.
Analogy: This is like the neck and shoulder of the microscope, connecting the head to the body.
Body Tube (or Head): Connects the eyepiece to the objective lenses.
Function: To transmit the magnified image from the objective lens to the eyepiece.
Analogy: This is the main tunnel through which the light and the magnified image travel.
Stage: The flat platform where you place the slide containing the specimen. It has an opening in the center to allow light to pass through.
Function: To hold the specimen slide.
Analogy: This is the tabletop where you place your object to examine it.
Stage Clips: Metal clips on the stage that hold the slide in place.
Function: To secure the specimen slide on the stage.
Analogy: These are like little hands that gently hold your object so it doesn't move around.
Using a microscope is like learning a new skill. It requires patience and care. Here’s how you should handle it, just like scientists in the Philippines do:
1. Carrying the Microscope: Always use two hands! Place one hand firmly on the arm and the other hand supporting the base.
* Carry it upright and close to your body. Never carry it by the eyepiece or the stage!
2. Setting Up: Place the microscope on a flat, stable surface, away from the edge. Make sure the revolving nosepiece is set to the lowest power objective lens (the shortest one, usually 4x). You should hear or feel a "click" when it's in place.
* Plug in the light source if it's electric, or position the mirror to reflect light if it's a mirror type.
3. Focusing: Place your prepared slide on the stage and secure it with the stage clips. Position the specimen directly over the opening in the stage. Look through the eyepiece. Slowly turn the coarse adjustment knob to bring the stage (or body tube) up until you see the specimen. Once you have a rough image, use the fine adjustment knob to make the image sharp and clear. If the image is too dark or too bright, adjust the diaphragm.
4. Changing Magnification: Once you have a clear image with the low-power lens, you can switch to a higher power. Rotate the revolving nosepiece to the next higher objective lens (e.g., from 4x to 10x). IMPORTANT: You will only need to use the fine adjustment knob to refocus when using higher power lenses. The image should be almost in focus already. If you need even more magnification, repeat the process, rotating to the high-power lens (40x) and using only the fine adjustment knob to focus.
5. Storing the Microscope: Always lower the stage completely using the coarse adjustment knob. Rotate the revolving nosepiece back to the lowest power objective lens. Remove the slide from the stage. Carefully clean the lenses with lens paper if needed (never use tissue paper or your fingers!). Cover the microscope with its dust cover. Store it in a safe, dry place.
Real-World Example 1: Observing an Onion Skin
Imagine you're a scientist in a Philippine agricultural research center. You want to study how plant cells are arranged. You take a thin layer of onion skin, place it on a slide, add a drop of water, cover it with a coverslip, and then place it under the microscope.
You start with the scanning lens (4x). You use the coarse adjustment knob to find the general area of the onion cells.
You see a blurry shape and then focus it using the fine adjustment knob. You can see many small, rectangular shapes – these are the onion cells!
You rotate the revolving nosepiece to the low-power lens (10x). The cells look bigger now. You use the fine adjustment knob to get a sharp image.
You might even try the high-power lens (40x). Now you can clearly see the cell walls, the cytoplasm, and maybe even the nucleus inside each cell! You adjust the diaphragm to get the best view.
Real-World Example 2: Looking at Cheek Cells
In a biology class in Manila, students are asked to observe their own cells. They gently scrape the inside of their cheek with a clean toothpick, transfer the cells to a slide with a drop of saline solution, add a stain (like methylene blue) to make the cells more visible, and cover it with a coverslip.
Using the scanning lens, they find the cluster of cells.
Switching to the low-power lens, they focus and see many irregular, flat shapes.
With the high-power lens, they can clearly identify the cell membrane (the outer boundary), the cytoplasm (the jelly-like substance inside), and the nucleus (the dark, often round spot containing the cell's genetic material). They adjust the diaphragm to make the nucleus stand out.
These examples show how the different parts of the microscope work together to reveal the hidden world of cells. Mastering the use of the compound microscope is your first big step in becoming a great Life Scientist!
Guided Practice: "Label the Parts!"
Let's test your knowledge! Below is a diagram of a compound microscope. Your task is to label each part correctly using the terms we've learned.
_________________________ (Eyepiece)
_________________________ (Arm)
_________________________ (Revolving Nosepiece)
_________________________ (Objective Lenses)
_________________________ (Stage)
_________________________ (Stage Clips)
_________________________ (Diaphragm)
_________________________ (Light Source)
_________________________ (Coarse Adjustment Knob)
_________________________ (Fine Adjustment Knob)
_________________________ (Body Tube)
_________________________ (Base)
Interactive Activity: "Microscope Parts Charades"
Let's make learning fun!
Write down the names of the different microscope parts on separate small pieces of paper (Eyepiece, Objective Lens, Stage, Coarse Adjustment Knob, Fine Adjustment Knob, Light Source, Diaphragm, Revolving Nosepiece).
Fold the papers and put them in a bowl.
Take turns picking a paper. Act out the function or appearance of that part without speaking.
The rest of the class guesses which part you are acting out! For example, you could pretend to look through the eyepiece, or twist your hand to show the revolving nosepiece.
Independent Practice: "Function Match-Up"
Draw a line to match each part of the microscope with its correct function.
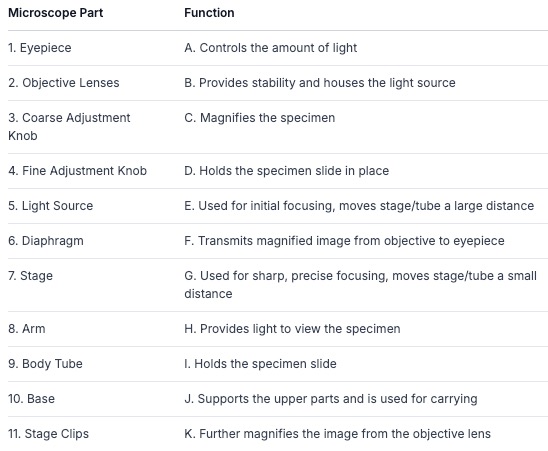
(Answer Key: 1-K, 2-C, 3-E, 4-G, 5-H, 6-A, 7-I, 8-J, 9-F, 10-B, 11-D)
Why is learning about the microscope so important, especially here in the Philippines?
Health: Doctors and medical technologists use microscopes every day to examine blood samples, identify bacteria or viruses that cause diseases, and diagnose illnesses. This helps them provide the best care for people in our communities.
Agriculture: Farmers and scientists use microscopes to study plant diseases, identify pests, and improve crop yields. This is crucial for food security in our country.
Education: Teachers like yours use microscopes to help students like you discover the wonders of science, just like we are doing now!
Research: Scientists in universities and research institutions use advanced microscopes to make new discoveries about life, from understanding how our bodies work to finding solutions for environmental problems.
By learning to use the compound microscope, you are gaining a skill that is used in many important professions and helps us understand the world around us better.
Let's summarize what we've explored today:
The compound microscope is a vital tool for observing tiny objects, especially cells.
Its main parts can be grouped into ocular, objective, focusing, illuminating, and support parts.
Key parts include the eyepiece (magnifies), objective lenses (provide different magnifications), revolving nosepiece (switches lenses), coarse and fine adjustment knobs (focus), light source (illuminates), and diaphragm (controls light).
Proper handling (two hands!) and storage are crucial to protect the microscope and ensure accurate observations.
We learned how to use the different lenses and focusing knobs to get a clear view of specimens like onion skin and cheek cells.
Now it's your turn to apply what you've learned!
Draw and Label: Find a picture of a compound microscope online or in a book. Draw it in your notebook and label at least 8 of its main parts. Next to each label, write down its primary function in one sentence.
Imagine: If you had a microscope right now, what is the first thing you would want to look at? Describe how you would use the microscope's parts (mention at least 3 specific parts) to observe it. For example, "I would look at a strand of my hair. First, I would place it on the stage and secure it with the stage clips. Then, I would use the scanning lens and the coarse adjustment knob to find it..."
Keep practicing, and soon you'll be a microscope expert, ready to explore the amazing world of Life Science!
No Comments Yet